Showing posts with label Between The Folds challenge. Show all posts

Tuesday, May 30, 2017

Patriotic Card for BTF #47B


Hello, crafty friends!  We are in the second week of our "Favorite Thing About Summer" theme at the Between The Folds Bi-Weekly Challenge Blog.  I had several ideas I was playing around with for this theme but a touching project and video were pointed out to me last week and I knew I had to share my version as well as pay tribute to the card maker and her inspiration.  Let's get started!


First off, I want to pay tribute to my inspiration for this project, Michelle Wright.  She is an SU Demonstrator and, more importantly, a Gold Star mom and I urge you to take a few minutes to watch her video all the way through.  For my Close To My Heart version, I used Sapphire and Cranberry inks with the Brushstrokes stamp set to create this flag image on White Daisy cardstock.  I then used the Stars Thin Cuts and white glitter paper to create the star.  I used a retired stamp set "A Thousand Thanks" and Sapphire ink to stamp the sentiment in the slightly darker area of the longer "stripes" where I had to overlap my stamping, which I am hoping gives a highlighted effect to the words.  So simple but very visual, and a very powerful message of thanks to the men and women who protect our country and our freedoms - and the families who sacrifice so much to support their loved ones who serve!

Summer can a very busy season, full of many of our favorite holidays and happenings.  I hope you will find time to share a project inspired by your favorite thing about summer and share it with us at BTF this week.  As always, your project needs to include some CTMH product(s) and you have until 11:59 pm Eastern Daylight Savings Time/10:59 pm Central to share your project HERE.  Thanks for stopping by and happy crafting!  ~~  Annette

Tuesday, May 16, 2017

Little Dreamer for BTF #46

Hello, crafty friends!  Have you checked out the beautiful colors in the Little Dreamer kit yet?  If not, you are in luck because that's the kit we're working with this week at the Between The Folds Bi-Weekly Challenge Blog.


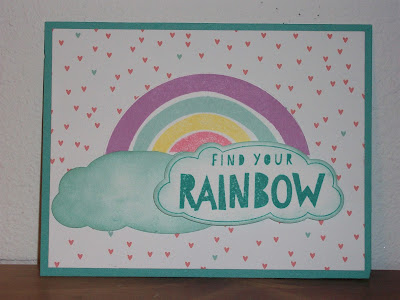
I am hoping the colorful rainbow and hearts will cheer up a friend and former neighbor who is battling spinal stenosis, a medical condition that causes chronic pain and pinched nerves.  For this card, I started with a 4.25 x 5.5" card base of Lagoon cardstock and this printed hearts panel from the Little Dreamer kit.  I then used Thistle, Glacier, Lemon, and Blossom inks with the coordinating scrapbooking stamp and die cut to create the rainbow.  I cut two clouds from the same kit and flipped the first one over and sponged the entire thing with Glacier.  For the second cloud, I used Glacier to ink the edges but then stamped this sentiment within the cloud outline in Lagoon so it would really stand out, and I raised that cloud with pop up tape.

We would love to see what you're making with this adorable kit.  As always, you have until 11:55 pm Eastern Daylight Savings Time/10:55 pm Central on Monday, 5/22/17, to link up your project HERE.

Happy crafting!  ~~  Annette

Tuesday, April 18, 2017

Some Kinda Wonderful for BTF #44 and Mojo Monday #493

Hello again, crafty friends!  I thought I had my Some Kinda Wonderful project figured out for this week's theme at Between The Folds Bi-Weekly Challenge Blog but when I saw this week's super cute sketch from the Mojo Monday Challenge, I immediately changed plans, dug into my stamp stash, and whipped up this sweet little card for a super sweet young friend of mine.


details:  CTMH Some Kinda Wonderful patterned paper, black and Raspberry CS
wreath stamp is Doodled Designs (retired CTMH); "hello" is from the Hello, Life - cardmaking set (retired CTMH); and the Scribble Heart is from Stampabilities
CTMH Raspberry and Memento Black inks
CTMH Gray and Pink Enamel Gems

We would love to see your projects featuring the CTMH Some Kinda Wonderful paper kit or it's color  palette of Black, Glacier, Lemon, Pacifica, Raspberry, Whisper, White Daisy, and Willow.  You have until 11:55 pm Eastern Daylight Savings time/10:55 pm Central on Monday, 4/24/17, to play along and you may link your projects HERE.  Thanks for stopping by and happy crafting!  ~~  Annette

Tuesday, April 4, 2017

Spring Theme for BTF #43

Hello again, crafty friends!  Our theme this week for the Between The Folds Bi-Weekly Challenge Blog is Spring.  This brings many things to mind: the Easter holiday, spring break, the beginning of the growing season and the return of flower and fauna, and - at least for my husband - the return of baseball season, lol.


Now, while I am not a gardener in any way, shape, or form I love seeing flowers and enjoy the colors of the season in all their many forms and hues.  So, I had this Dreamin' Big - Scrapbooking stamp in mind for this challenge from the beginning.  Then, a few weeks ago the CTMH artwork team showcased how to use pigment inks with clear embossing powder for a lovely new technique and I knew I had to try it.  I  used the Pixie, Sorbet, Canary, Sweet Leaf, and Thistle colors from the Whimsy Pigment Ink Pads and clear embossing powder with for the "hello," and Versamark and white embossing powder for "spring."  I used the Sweet Leaf and Crystal Blue watercolor patterned papers from the Whimsy fundamental papers for the background/card base and also for the bottom third of the card, which I trimmed with a pair of decorative edge scissors.  The final touch was a length of retired Thistle ribbon tied into a bow.  This is a fun technique and my photo really doesn't do justice to the glossy colors that the pigment ink and heat embossing bring to the card; the only downside is that it's a bit tricky to wash all the pigment ink from such an intricate stamp set.

This theme is very open to interpretation and we'd love to see what "spring" means to you and your projects.  You have until 10 pm Eastern Daylight Savings Time/11 pm Central to link your projects, which you can do HERE.  Happy crafting!  ~~  Annette

Tuesday, March 7, 2017

Working with Complements for BTF #41B

Hello and welcome back, crafty friends!  This is our second week of working with our Complements theme over at the Between The Folds Bi-Weekly Challenge Blog.  CTMH currently has 15 different complements kits to choose from, ranging from the ones that coordinate with the paper packs in our seasonal kits, ones that coordinate with the various color palettes showcased in our Annual Idea Book, to stand alone kits.  Factor in that many colors in the CTMH palette cross over among various complements and paper kits, the mix and match factor provides endless possibilities!


For this particular project, I chose to pair the Uptown Fundamental papers with the new Springtime complements, particularly the pieces with gold foil.  I had a special set of photos to work with that were taken at the annual Y-Teens father/daughter and mother/daughter banquets from each year my daughter was in high school.  We never knew what background the photographer would bring for each event so while there was a lot of burgandy, there were other contrasting colors in this grouping as well so I needed a neutral background that wouldn't clash with any of the photos.  I thought the white and gold background would add a little emphasis on fit the bill while the metallic gold can be hard to photograph, I was really happy with how this project turned out.


details:  I used a 12 x 12" base of White Daisy cardstock and cut two of this white and gold striped paper and the white and gold dotted vellum papers into 6" squares which I alternated.  I used the gold foil "grow," "bloom," and the ampersand (not to mention the white-and-gold comma carefully placed) in the white spaces as they were already covered in metallic gold, but the "smile" was white color-ready chipboard.  I knew it was going to have to be spaced over both white and gold due to its size, so I used my gold shimmer brush to go over it so it wouldn't blend in to either background stripe, and I used a gold heart to dot the "i."  I used my watercolor paints with the gold embossed white chipboard pieces to incorporate some of the colors in the backgrounds of the photos and tie into the title.  I painted another shape and used the gold letters from a retired fundamental stickers kit in the corner, but I could have used my Cricut to cut the letters from one of the wide gold strips in the leftover striped paper.  Also, here's a tip:  If you choose to paint these accents, go over the gold lines with a twisted paper towel or napkin once the paint is dry and that will remove any paint on the metallic embossing so that the gold stands out again.  How fun is that?!?!  So these lovely fundamental papers and complements helped me finally get this challenging group of photos scrapped together a mere 4 years after my daughter's graduation, lol.

We would love to see how use put the various CTMH Complements kits to work in your cards and layouts so if you find time in your busy week to create with them, you can share your project by linking it HERE.  As always, you have until 11 pm Eastern/10 pm Central on Monday evening (3/13/17 for this particular challenge) to link your project.  Happy crafting!  ~~  Annette

Wednesday, March 1, 2017

Dreamin' Big for CTMH Featured Products Blog Hop

Hello and welcome back for another installment of the Close To My Heart (CTMH) Featured Products Blog Hop, where this week we are bringing you projects featuring the Dreamin' Big paper kit, it's color palette, and/or the Dreamin' Big cardmaking stamp and coordinating die cut set (which is 25% off during March).  If you have come here from Corinna's blog you are in the right place but hops are circular so you are welcome to jump in anywhere along and follow the links until you've made

the rounds.  A complete list of this week's participants is included at the end of this post in case you get lost along the way.  Now on to my project!


details:  As stated, I started with the Dreamin' Big paper kit.  I chose the gray woodgrain patterned paper for my A2 card base and then used this pattern from Make It From Your Heart Vol. 2 book of scrapbook and card patterns.  I played around with various combinations before settling on this sentiment from the Dreamin' Big cardmaking stamp set  stamped in Poppy ink on a 2" square piece of White Daisy cardstock.  I backed that piece with another white square that measured 2 1/8" and adhered Poppy Thick Twine with a glue pen and then trimmed the corners so they didn't stick out.  I backed that finished square with another of the same dimensions using another patterned paper from this kit and Poppy cardstock.  To finish off the card, I cut a strip of Glacier cardstock and embellished with 2 small and 1 large gold Durable Triangle Studs (no longer listed in the Idea Books but on clearance while supplies last).

And that's all there is to this one.  Now you're off to visit Lauren and see what magic she has in store for you.  I hope you will join us again in two weeks, on 3/15/17, when our theme will be Glitter and Shimmer.  Until then, happy crafting!  ~~  Annette


Complete list of participants:

1.  Corinna Murphy

2.  Annette Clark (here)

3.  Lauren Moore

4.  Donna Digby

Tuesday, February 21, 2017

Hello Lovely Wedding Card for BTF Challenge 40

Hello again, crafty friends!  Even though it's been a fairly mild winter where I live, I am still longing for spring so I've been having a great deal of fun playing with the beautiful floral and spring colored geometric patterns in the Close To My Heart "Hello Lovely" kit for my design team submission for this week's challenge at the Between The Folds Bi-Weekly Challenge Blog.

I was particularly inspired by this week's sketch over at Mojo Monday so I used it as my starting point.  I used a standard 4 1/2 x 5 1/2" card base in Desert Sand and cut the dot patterned Sorbet paper for the foundation layer.  I cut a piece of Colonial White cardstock at 3 1/2 x 4 5/8" and punched the edge with a scallop pattern and topped that piece with a 2 3/4 x 4 5/8" panel.  I used one of the PML cards from the Hello Lovely kit and trimmed the 1/4" from the top of this 4 x 3" vertical panel and dovetailed the bottom to form the banner shape.


For embellishments, I used the medium and small hearts from the Hello Lovely complements placed on the same patterned paper as the foundation layer and fussy cut around them.  I used my favorite white and gold ribbon to form the bow which is tied around this antique rose charm which is the last one from the first set of Base and Bling set that CTMH came out with.

For the sentiment, I used Desert Sand ink with the retired Mr. and Mrs. set.  I can't help but feel this paper kit lends itself perfectly to wedding cards and layouts, but maybe that's because there are a couple of spring weddings coming up in my family!
The Hello Lovely kit is also this week's theme at the Color My Heart Color Dare and one of this month's themes at the Heart 2 Heart Challenge Blog so I will be entering this card in both of these challenges as well as the sketch challenge at Mojo Monday.

Thanks for stopping by and happy crafting!  ~~  Annette

Tuesday, February 7, 2017

Using Ribbon for BTF Challenge #39


Hello again, crafty friends!  This week's theme at Between The Folds Bi-Weekly Challenge Blog is to use ribbon, and we have plenty of lovely options to choose from between the current Annual and Seasonal Idea Books (plus a couple of additional choices in the clearance section of our online shopping sites).  Let's take a look at what caught my fancy this week:


details:  I started with a strip of this heart patterned paper from CTMH's retired set of fundamental papers.  I paired that with this lovely gold metallic XOXO printed ribbon from the gorgeous Uptown Ribbon Pack on the top and bottom of the center panel.  I used the Hearts Thin Cuts die set and red glitter paper to make two sizes of hearts which I knotted together with a piece of white and gold ribbon.  For the sentiments, I used black Memento ink and the January 2017 Stamp of the Month set "Adore You" (with the "and" from the retired Card Word Puzzle set) on the left, and the stamp set from the retired Heartstrings WOTG on the right.  Simple to make but simply lovely in person!  The only thing I dislike about this lovely Uptown ribbon is how hard it is to get a good photo of that metallic gold, my poor photography skills just can't do it justice.

We would love to see what you like to create with the various ribbons CTMH gives you to choose from, so if you find some crafty time in your busy week you can add your link HERE and, as always, you have until 10 pm Eastern/11 pm Central on Monday, 2/13/17, to share your projects.

Happy crafting!  ~~  Annette

Tuesday, January 10, 2017

Sugar Rush Color Palette for BTF Challenge

Hello and welcome back, crafty friends!  This week's theme at Between The Folds Bi-Weekly Challenge Blog is the Sugar Rush paper kit.  Unfortunately, I didn't order my kit in time so I challenged myself to get creative with the color palette.  Since my first craft love was stitching and fabric crafts, I decided to piece a quilt block card to send warm winter wishes to a good friend.

 details:  I began by cutting a 6" square card from White Daisy cardstock and a 6" square piece from Whisper for the base.  I used the retired Art Philosophy cartridge to cut the shape at 5 1/2" from White Daisy.  When I removed the paper from the cutting mat, I used my trimmer to trim the piece down to a 5 1/2" square and adhered the negative space pieces for the base of the quilt block.  I then cut the same sized star using the layer function from Sea Glass, Canary, and Blossom cardstock.  I used the outline or frame piece from the Sea Glass and then alternated the Canary and Blossom pieces.

I used Sea Glass ink and the twisty lines stamp from the Way To Go set in each of the corners for the "quilting" and the background stamps that came with the Flower Market cartridge on the Canary and Blossom pieces using Tangerine and Pomegranate inks.  I also used the Pomegranate ink with the stitched line stamp from the retired Elemental WOTG set for the border.  To finish off my "quilt," I used Raspberry ink to stamp the center button from the retired Buttons, Bits and Bobs set, and then I went over the button with my clear shimmer brush and secured it to the card with white twine.  I love how it turned out and can't wait to give it to my friend, probably with a loaf of strawberry bread fresh from my oven.

Thanks for stopping by and be sure to check out the other fabulous projects at the BTF Challenge Blog.  I also hope you find time in your busy week for a little crafting and decide to play along with us.  As always, you have until 11 pm Central time on Monday evening (1/16/17 for this challenge) to link your project using the link you can find here.  One last note, if you love creating with Close To My Heart products, we would love for you to consider joining our design team!  If you are interested, you can find more information on our current design team call by going here.

Thanks for stopping by and have a happy, and crafty, new year!  ~~  Annette

Tuesday, December 13, 2016

Oh! Deer Gift Box for BTF #36

Hello, crafty friends!  I hope the advent of the holiday season finds you more blessed than stressed!


This week at Between The Folds Bi-Weekly Challenge our theme is the Oh! Deer paper kit and it's color palette, which contains a lovely combination of greenish-blues, neutrals, and silver and gold. This has also proven to be more versatile as I expected, and it got me thinking outside the box... which led me to create this fun gift box to hold one of my husband's Christmas presents.

details: I used the retired Artiste cartridge to size and cut a lid for a 4" box from a piece of Sea Glass cardstock.  I created my own box by scoring and cutting a 12" sheet of white cardstock, which I decorated with various panels of the pocket scrapbooking sheet from this kit as well as the lovely gold and silver foiled complements for this kit.  For the lid, I added a strip of paper that had a subtle pattern of Sea Glass polka dots on a white background, because I wanted a little color but not so much that it would compete with the bow cut from 8 strips (6 x 3/4") of the swirling stars patterned paper and 4 strips (4 x 1/2") of the Desert Sand paper with a pattern of musical notes.  For the center, I used a 3 x 1/2" strip and a large brad to secure both ends of each strip, and then secure the entire bow to the lid.  For the final touch, I added the silver and gold foil starts in a random pattern.

edit:  I also made the box so that it folds flat in hopes that it can be saved and reused multiple times, whether for decor or gift giving.  Here are some pics I hope will help, basically I scored every 4 inches, drew a diagonal line from point to point and cut off the corners of the 12 x 12" paper, and scored those sections diagonally for a fold line so that it folds in.  If this isn't clear enough, I can add a diagram later.


I hope you will take time to check out all the projects our design team and participants have come up with using this lovely and versatile kit, and perhaps you will find some time to craft this week and share your creation as well.  As always, you have until Monday evening at 10 pm Eastern/11 pm Central, and you can link your projects here.

Happy crafting!  ~~  Annette

Tuesday, November 15, 2016

City Sidewalks for BTF #34


This week's challenge at the Between The Folds Bi-Weekly Challenge is the City Sidewalks paper kit of it's color palette.


I chose to use the green and red patterned papers from the City Sidewalks kit with my favorite pattern from page 46 of the Make It From Your Heart Vol. 2 pattern book.  I used this striped paper from the same kit to back the sentiment and bell image, both of which are from the Yuletide Joy set and stamped in Memento ink.  I used the Vivid GreenLeaf Green, and Carmine ShinHan markers.

We would love to see your creations featuring the City Sidewalks paper or its colors.  You have until Monday, 11/21/16, at 11:55 pm Central time to link your projects here.

Happy crafting!  ~~  Annette

Tuesday, October 18, 2016

Swan Lake for BTF Challenge #32

Welcome, crafty friends!  This week at the Between The Folds Bi-Weekly Challenge Blog our theme is the Swan Lake paper kit or its color  palette of Black, Canary, Fern, Glacier, Goldrush, Peacock, Poppy, Slate, Whisper, and White Daisy.  Wow, that's a lot of colors!  So many that I had a really hard time deciding which ones to focus on so instead of choosing, I tried to use them all!

details:  I really love autumn and the Thanksgiving holiday, so I was in a particularly playful mood when I started putting this card together.  I used a combinations of zip strips and 1/2" wide strips of the patterned paper to make a panel of woven strips, stamped this adorable patterned pumpkin image from the new Autumn Wishes set in Goldrush and Fern inks, set it on a panel of white CS and the Peacock patterned paper, and then I brushed the pumpkin with the shimmer brush.  For the panel on the right, I broke out a retired set called Poster Tidings, which I masked several times so I could use multiple inks.  (Here's a hint:  stamp the top and bottom lines together and then mask/stamp one color at a time, using the "autumn" and "blessed" to get everything lined up.)  I topped that with strips of the retired bronze shimmer trim.

For the inside, I cut a piece of Whisper CS to the size I needed and topped that with this pocket panel featuring this pair of swans.  I used the retired scrapbooking and card making workshop stamps from last year's Pathfinding kit and added these 3-d heart and arrow pieces from the Swan Lake complements.
Thanks for stopping by and don't forget that you have until Monday evening, 10/24/16, at 10:55 p.m. Central to link your Swan Lake themed project if you want to play along with us this week.  The more the merrier and we'd love to see what you come up with!

Happy crafting!  ~~  Annette

Tuesday, October 4, 2016

Creative Stamping for BTF #31

Hello and welcome back,, crafty friends!  We're all in our second week of our Creative Stamping Techniques theme at the Between The Folds Bi-Weekly Challenge Blog.  There are so many fun things you can do with CTMH's My Acrylix stamps that I had a hard time narrowing down what I wanted to do, so I went back to one of my faves, blending and shading by "rocking and rolling" a stamp in at least two colors of ink.  Here's my take for this project:

I used the new Swan Lake paper kit and the retired "Feathers" stamp set.  For the blue feathers, I used Glacier and Peacock; Whisper, Slate, and Black for the gray feahers; and Canary, Goldrush, and Poppy for the orange-red feathers.
To accomplish this, you stamp the majority of the stamp in the lighter color, "rocking" the stamp on the pad, and then layering on more ink by rocking the stamp onto another ink pad or using a sponge dauber to brush on additional in.  To get the darker edges, you simply "roll" the edges of the mounted stamp onto the darkest ink pad you are using.  It's a fun technique that makes a uniquely shaded image each time.

Don't forget to check out all the creative stamping projects by both the participants and the rest of the design team at the Between The Folds challenge.  We'd love to see what you come up with too, so if you find yourself doing some creative stamping this week you have until 11:55 pm Eastern/10:55 pm Central on Monday, 10/10/16.

Happy crafting!  ~~  Annette

Tuesday, September 20, 2016

Jeepers Creepers for HP Tribute for BTF Challenge


Hello, crafty friends!  This is the second week of our Jeepers Creepers theme at Between The Folds Challenge Blog.  I'm so in love with the colors in this kit and I can't wait to show you my project!

Confession time:  I didn't take up scrapbooking until I was in my 40's and my son, disabled and severely epileptic since birth, had passed away.  My family and I had so many precious memories we didn't want to let slip away, but for a long time it was too overwhelming to actually scrapbook them.  However, as soon as I saw this fun kit and it's brightly colored, whimsical embellishments I knew there was one very special memory I HAD to tackle.  I was even inspired to write up the whole story of how the only movie my son ever got to see in a theater was "Harry Potter and the Sorcerer's Stone," but my printer chose today to go on the fritz and I had to improvise for the journaling.  So I jotted down a condensed version on a journaling card left over from the Everyday Life planner kit, which I topped off with the Jeepers Creepers washi pack which I love!  It was a little plain with just the card on the left side so I made a diagonal panel, cut one of the zip strips in half and mitered the corners and placed that behind the journaling card for visual interest.  I also added a couple of the purple lightning bold puffies from the assortment for this kit.  I used the
Artistry cartridge for the lightning bolts and glasses, the cauldron is from the "Happy Hauntings" cartridge, and the title is from the "HarryP" font I downloaded from a site called DaFont.  So in the end, this page isn't quite what I had envisioned but the most important thing is I got this one done and my family can relive this special moment forever.  And that's what memory keeping is all about, after all.

So thanks for stopping by and letting me share this special moment in our family's history.  I hope you are inspired to unleash your creativity this week and share your Jeepers Creepers inspired projects with us at the Between The Folds challenge blog.  You have until Monday, September 26, 2016 at 11:55 p.m. Eastern/10:55 p.m. Central time to link your projects.

Happy crafting!  ~~  Annette

Monday, September 5, 2016

Random Stamping Projects for Between The Folds 29B


Hello and welcome back, crafty friends!  We are in our second week of projects featuring random stamping over at the Between The Folds challenge blog.  Not only is this really fitting since September is National Stamping Month, but it's one of those themes which are only limited by our imaginations, so the possibilities are virtually endless!


This one was really pretty simple once I settled on what I wanted to do.  I started with the recently retired "Diamonds Are Forever" stamp set from CTMH's May-August 2016 Seasonal Expressions idea book.  I tried making this on an A2 size card but that looked too crowded once I put my sentiment piece in place, so I started again with a 6" square card and liked how that looked much better.  I used a piece of Ruby CS for the base and then used Sapphire and Gypsy inks as well as the retired Topiary, Ruby, and Creme Brulee inks to stamp the jewels.  For the center piece, I used the center cut function on my Cricut Expression with the Artistry cartridge ( found on p.13 of the booklet) at 2" and 1 3/4" so that I came out with a thin frame of gold glitter paper, adhered that to a 2" cut of the same shape on white CS, and used Sapphire ink to stamp this sentiment from the same set.  The only thing missing is a little shimmer I want to add to the gems with a clear Shimmer Brush but I forgot to order it in time for this challenge.

I hope you will take time to check out the rest of the random stamping projects from the other design team members as well as our participants.  And as always, we'd love to have you join us this week at the Between The Folds challenge blog and share your project.  It's fun and it's easy, you just have to use some CTMH product (and let us know what  you used if it isn't obvious).  You have until 11:55 p.m Eastern/10:55 p.m. Central on Monday, September 11, 2016 to link your projects so there's still plenty of time to play along.

Thanks for stopping by and happy crafting!  ~~  Annette
Tuesday, August 23, 2016

Watercolor Fun with BTF Challenge


Hello and welcome back, crafty friends!  This week at the Between The Folds challenge blog we are creating with a water theme.  The first thing that came to my mind was all the paints, brushes, watercolor pencils, watercolor paper, and resist pattern watercolor Picture My Life cards for quite some time but I simply hadn't taken the time to actually sit down and try them, but now that I have you can be sure my paint brushes will be getting a workout.

I've had this hostess rewards stamp set called Unicorn Dreams (now retired) for some time but could never quite decide what I wanted to do with it.  And while I knew I wanted to break out my watercolor paints for this challenge, I was a little stuck coming up with a project so I decided to make something for myself, just for fun, and enjoy the experience of playing with something new to me.  I admit, I need to play around a bit more with heat embossing in combination with watercolors as this silver embossed unicorn is a bit patchy close up, but it's just for me and I actually kind of like that some of the background paints come through in places, it seems to make the unicorn image even more mystical.  I backed my 3 1/2 x 5 1/2" painted panel on a 4 x 6" piece of the retired Kaleidoscope paper for a little added color fun.

We'd love to have you join us this week at Between The Folds Challenges and share your watercolor or water inspired projects.  It's fun and it's easy, you just have to use some CTMH product (and let us know what you used if it isn't obvious) and you have until 10:55 p.m. Central on Monday, 8/29/16 to link your projects.  Happy crafting!  ~~  Annette

Tuesday, August 9, 2016

Fabulous Florence for BTF Challenge

Welcome!  This week at the Between The Folds Challenge we are featuring projects using CTMH's fabulous Florence paper kit and coordinating embellishments.  This collection has a fresh, floral Bohemian kind of theme and I have so many projects I want to do with it, but today I want to share a 2-page layout based on the fourth pattern in the Make It From Your Heart Vol. 1.


This is a fun and easy layout pattern to work with, it mostly consists of 3" squares with rounded corners.  One tip I've found for easier placement is to lay both pages on one of my older 12 x 24" Cricut mats and align things with my 14" ruler.  I used a little of the Flaxen patterned paper from the original (retired) set of fundamental papers where the photos will go and the zip strips from one of the patterned pages in the kit.  I also added some of the Florence complements for a little added interest.  It's hard to do these embellishments justice in a picture but they feature a lovely rose gold metallic finish, which I love!  The medallion was stamped with the Ornate Blossoms set and I haven't decided whether I will color it in with water color pencils or leave it as is, as I want to see how it looks once I choose my photos and have them in place.

And that's all there is to this one.  I love when projects are this easy but look so great!  Don't forget to check out the rest of this week's projects at the BTF Challenge, you wont' want to miss them.  We are so blessed to have such a talented group of folks on our design team and followers but there's always room for one more so I really hope you will join us and share your Florence-based project!

Happy crafting!  ~~  Annette

Tuesday, July 26, 2016

Artistry Awesomeness for BTW #26


This week's challenge at Between The Folds Challenge Blog is to make a project using a Creative Cut.  You may use one of the exclusive CTMH Cricut cartridges, our Thin Cuts, or cut something by out by hand.

I am still making teal based thank-you cards for a local woman battling ovarian cancer; she is a very beloved high school teacher and member of our community so she  needs LOTS of thank-you's and I have really been stretching my creativity to try to make her day.  For this one, I used the Artistry cartridge for this fun cell phone image using the Lagoon piece of the first style (discontinued) of Fundamental papers and black CS (5 inches in height) as well as the text bubble from a piece of Honey CS (I was going more for width which ended up being 1.44 inches).  I used the Beyond Awesome stamp set in black ink for the "way awesome" sentiment and then used Cotton Candy ink on white CS and fussy cut the "you are..." part.  For an added little touch, I took the negative-space piece from the bottom button cut out and glued that to a scrap of white CS, fussy cut, peeled the two pieces apart and erased the left over adhesive on the white bit, and overlayed that with a retired metallic silver washi tape that went with the Sparkle and Shine Christmas set from a few years ago, then glued that piece in place and put it all on this soft speckled background paper from the current Calypso paper kit.  So actually, this project uses both hand- and Cricut-cut images.  This one was so fun to put together and so contemporary, I think I may try a couple of variations on it, and by the time I'm done with all my designs I hope to have several dozen cards to help brighten my friend's day.

Thanks for stopping by and don't forget to check out all the fabulously creatively cut projects over at BTF this week, and we'd love to see something of yours as well!  You have until 10:55 pm on Monday, 8/1, to link your project if you'd like to play along.

Happy crafting!  ~~  Annette

Tuesday, July 12, 2016

Magical Mojo for BTF #25

Welcome!  Growing up, my brother was a big fan of "The A-Team" so we had to watch it every week and while it wasn't my favorite program, I did always like one character's saying at the end of each episode, "I love it when a plan comes together."  Well, this project is one of those times when Plan A didn't pan out and I didn't actually have a Plan B but thank goodness inspiration - or rather, inspiration from multiple sources - came together and I finally have a cute little card to share with you.

For starters, the theme this week at Between The Folds challenge is CTMH's Magical paper kit.  This is a really fun, super versatile collection of patterns and colors.  My first intention for my design team project this week was a very involved layout featuring
a trip to a nearby "red" or Farmall tractor museam for so my husband's birthday last week; it will be great when I have this project done, but considering I took 98 photos, that's not likely to happen this week.  So, back to finding a Plan B.  Luckily, as soon as I saw this week's Mojo Monday I fell in love with it and immediately pictured several variations of cards using the Magical papers.  After some dabbling, this is what I came up with.

Thanks for stopping by, and please take time to check out the other projects at BTF challenges and hopefully you can share your inspiration too (you have until Monday, 7/18, at 10:55 pm Central.  Happy crafting!  ~~  Annette

details:  All products used are from CTMH.  As stated, I started with the Magical paper kit and this sketch over at Mojo Monday.  I used a piece of Crystal Blue CS cut at 4 1/8 x 3 3/8" and topped that with the large polka dotted piece measuring 4 x 3 1/4".  The yellow dotted medallion was cut with the Art Philosophy Cricut cartridge at 2 1/4" ( image found in p.31 of the booklet) and the center circle was cut at 2" using white CS.  I used the medium flat waterbrush and ink pressed into the lid of the Crystal Blue ink pad to create a subtle background color and then I stamped the main part of the sentiment in Sapphire ink using the Beyond Awesome stamp set.  Using the same set and Cranberry ink, I stamped and fussy cut the curved "awesome" banner and glued it onto the medallion.  The bottom banner is one of the zip strips backed by Whisper CS, both of which were just trimmed by hand until I got the look I wanted, with the patterned piece being about 2 1/4" long.   For embellishments, I chose to color a couple of the white enamel stars with the turquoisegolden yellow, and carmine ShinHan alcohol markers.

I am also entering this card into this week's Color My Heart and the 7/4/16 Heart 2 Heart dare, where the themes are also the Magical kit.

Tuesday, June 28, 2016

Calypso Birthday for Between The Folds Challenge


Hello, crafty friends!  It's officially summer and here at my home in Iowa that means heat, humidity, and lots of family get-togethers for all the summer holidays and birthdays, particularly my sister's and husband's as their celebrations are just days apart and fall on either side of the 4th of July.  Luckily, the theme this week over at the Between The Folds challenge is birthdays and the theme over at Heart 2 Heart Challenges is Calypso paper!  My sister is a big fan of pink and I already had the paper, stamps, and embellishments in mind, I knew her card would come together quickly so I created hers first.  She is a sweet, gentle soul so I wanted to create a soft but whimsical card for her.  Hopefully this will bring a big smile to her face and earn me a hug!  

details:  I started with a piece of Lagoon CS and the speckled Calypso paper for the card base.  Then I cut the and corresponding layer from the Art Philosophy Cricut cartridge (p. 52 of the booklet) at 3 1/2", the plain oval image in white and the layer image in Calypso's pink watercolor-looking paper.  For the accents, I used the turquoise blueleaf greenpeony purple, and tender pink alcohol makers to color the retired Opaques faux pearl gems.  Each of the stamped images was done with Black Memento Ink and fussy cut from the May Stamp of the Month, Celebrate With Cake, using a scrap piece of the striped 4x 6" printed piece for the candle and the yellow and white wide-striped Calypso paper for the banner with Lagoon ink for the sentiment.

And that's all there is to that one!  Thanks for stopping by to take a look and please take time to check out all the fabulous birthday-themed projects at this week's BTF Challenge, and we'd love to see your creations too!  Entries for BTF can be linked up until 10:55 p.m. Central on Monday, 7/4, and the Calypso challenge over at Heart 2 Heart runs through June 30th.  Happy crafting!  ~~  Annette