Wednesday, April 20, 2016

CTMH Featured Products Blog Hop with Mother's Day Themed Stamp Sets

Hello again and welcome back for another inspiring Close To My Heart Featured Products Blog Hop where this week we are spreading lots of love with our Mother's Day themed stamps.  If you have just joined us you can start here and continue on, as hops are a circular kind of thing, but you can also find a complete list of participants at the end of this post in case you get lost along the way.  If you came here from Corinna's blog you are in the right place, and now allow me to share my project with you.

I thought I would use this Mother's Day as an opportunity to make a particular card from the CTMH Artiste Cricut cartridge (found on p. 55 of the handbook or the G key/card function setting) because this one actually makes a pocket in the center to hold a gift card.  I had never used this cut before so it took a bit of trial and error to get it sized the way I wanted, but I finally settled on 5 inches in height.  I then cut that image 2 times, once in white CS for the base and once in the multi-colored flower


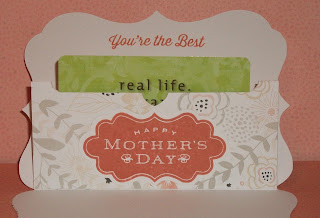
pattern from the Charlotte kit which I then cut along the score lines.  I used a thin line of liquid glass adhesive along the inside edges of the pocket and I used another segment of the patterned paper to cover the front of the pocket.  I sponged Sorbet ink onto a 1/2" wide strip of the black paper with white flowers and I chose the pale pink/peach paper for the shape for the "mom" sentiment using the Artfully Sent cartidge at 2" height (p. 4 of the handbook or 4 key/ and icon setting).  I used black ink to stamp this image from the Flowers For Mom set and then sponged the edges in black.

Finally, I used Sorbet ink for both sentiments on the inside of the card.  The "You're the Best" is from the Hostess Rewards set, Say It All, and for the "happy mother's day" sentiment I used the Perfect Fit - Mom set on a piece of white CS that had been cut into that shape using the Artiste cartridge again at 1 1/2" (p. 33 of the handbook or 3 key/accent 3 feature).

I really love using this Charlotte paper for Mother's Day cards because it's so floral, feminine and elegant.  In fact, I've already made two other Mother's Day cards with these papers, here are the links in case you want to see those:  AHSC sketch #152 and a Mother's Day card for AHSC #148 (this one is my favorite of all the cards I've made so far).

Thanks for stopping by and don't forget to hop on over to Catherine's blog to check out her lovely project, and feel free to leave comments for my fellow participants.  We love bringing you inspiration and we love hearing from you too!  I hope you will join us again on May 4th when we will be featuring projects created using the exclusive CTMH Artistry Cricut cartridge.

Happy crafting!  ~~  Annette

Planner Page for AHSC #156

I just adore this week's sketch at the Atlantic Hearts Sketch Challenge.  As soon as I saw it, I knew that I wanted to use it to make my own divider page for my Everyday Life album; the only "challenge" I had was carving out the time to make it.  This project took a bit of time as I wanted to create a Cricut file in case I wanted to make more dividers or pages in the future, but it was totally worth it because as much as I LOVE my planner album, I love to customize it even more!


details:
  I used the lovely Kaleidoscope paper kit and adhered that to a base I created on white CS, just to give it some extra sturdiness and so I could sponge ink onto the divider tab so it would be in keeping with the water color theme.  I used the Art Philosophy Cricut cartridge to cut the frame in Gypsy CS.  I used the Brushstrokes stamp set in Pear, Gypsy, and Pixie inks for the brushstroke images.  For the sentiment, I used a consultant-only stamp set, masking the image so I could basically divide the entire image into three parts, stamping the top and bottom ones in Gypsy and then using Versamark and gold embossing powder to heat emboss the word "life."  To finish it off, I added two different sized hearts from the Treasured Puffies as well as the white and gold ribbon.  This is one of the few times I feel like one of my projects turned out better than I had envisioned it, and I know I'm going to enjoy using it in my planner every day!

Thanks for stopping by and I really hope you will play along with this week's sketch challenge or at least stop by the AHSC blog to check out the fabulous projects from the participants as well as the rest of the design team.  Happy crafting!  ~~  Annette

Tuesday, April 19, 2016

Between The Folds Challenge 19B Featuring Regatta

Hello and welcome back!  Today I am sharing a fun card I made for the Between The Folds Challenge Blog where this week we are featuring CTMH's Regatta paper pack.  While I love the colors in this kit, living in the Midwest we are far from any coastlines so I wasn't sure what I might do with this one.  However, during a random conversation last week concerning family holidays I was reminded of how one of my aunts hosts dozens of people from both sides of the family every 4th of July, and I immediately knew what I wanted to do for this project.  I had also been wanting to try my hand at the drapery fold cards I have been seeing everywhere so I made that part of the project.  This kind of card might look challenging but it's actually super easy, now the hard part will be waiting three months to be able to give this to my aunt!


details:  As stated, this card features the Regatta paper kit.  If you look closely at the red and white striped paper, you will see it is actually white paper with very thin Glacier blue pinstripes.  To achieve the stripes I masked sections with washi tape and then sponged on Pomegranate ink.  Once I had cut, scored, and folded the card into the drapery fold pattern, I adhered the "flag" to a piece of white CS and backed that piece with a card base cut from Sapphire CS.  I used the Artiste Cricut cartridge to cut 2 rosettes at 1 1/4" from another piece of the Regatta papers and glued them together, and I topped that off with a chipboard star covered with the white piece from the gold glitter paper set.  The cursive "thanks" was stamped in Sapphire ink using the retired Hostess Rewards stamp set called  Variety of Thanks.

For the inside, I cut another piece of the white/blue pinstriped paper and rounded the edges.  I used Pomegranate ink again to stamp the banner image and the Sapphire ink for the sentiment, both of which are from the Banner Wishes set, onto the flip side of the white/blue pinstriped paper and fussy cut it.  I felt it was lacking a little something so I pulled out a punch and a scrap of the same paper to whip up a couple of little stars for the corners, and that's all there was to this one!


Thanks for stopping by and please remember to check out all the projects from the participants as well as the other design team members over at Between The Folds.  And don't forget, you have until Sunday evening to play along, the more the merrier!

Happy crafting!  ~~  Annette

Wednesday, April 6, 2016

Fundamental Stickers for CTMH Featured Product Blog Hop

Hello again and thanks for  joining us on another Close To My Heart Featured Products Blog Hop where this week we are using Fundamental Stickers.  If you've come here from Catherine's blog you are in the right spot, but hops are circular things so you are welcome to jump in anywhere along the way and follow the links till you've made the rounds.  In case you get lost along the way, there is a complete list of participants at the end of my post.
So, onto my project!
I used the Sangria paper kit and the Enchantment Fundamentals pack for this layout, which I planned for my upcoming birthday, which is in the fall but I knew I wanted to use these colors so I figured I'd better make it now as the Sangria kit will no longer be available at that time.  For the record, this might just be the first time in my life I've done anything this early, lol!


The next stop on the hop is Kim's blog so if you haven't stopped by there yet, be sure to check out her lovely project.  Again, below is the complete list of this week's participants.  Thanks for stopping by and happy crafting!  ~~  Annette

Sending A Little Love for AHSC #154

Hello again!  I needed a very special card to cheer a young friend having dental surgery today, and I wanted to use a particular paper because she LOVES pink and she chose this paper the first time we made an altered a notebook together.  I also knew I wanted to use this week's sketch at Atlantic Hearts Sketch Challenge and this combination of stamps, but from there things got really tricky.  Nothing matched quite the way I wanted, the embellishments I had planned didn't jive once the stamped tag was in place, and so on.  So, this card was truly a work of heart as I literally worked on it all night until I was happy with it.  I love this sketch because it's just perfect to attach a gift card on the back with a ribbon or little tag of tape and still have room to leave a little personal note.


details:  I used a retired paper named Sweetheart for both the darker and lighter panels.  I used the Art Philosophy Cricut cartridge for the border, which was cut in Hollyhock cardstock.  I used the Share the Love stamp set in Pixie for the sentiment, which was backed with more Hollyhock CS and I added one of the darker glitter hearts from the Enamel Glitter Duos Purple Hearts for a little sparkle.  For the tag, I used the Candlelight Garden set (the SOTM this past December) in Whisper for the jar, and the Charming Cascaded in Pixie for the hearts, using a masking technique to keep the hearts "in" the jar.  So, this one took a bit of time and effort but if I can make my young friend smile, it will all be worth it!

Dont' forget to head over to the AHSC blog to see the design team's creations and hopefully you can play along!  Happy crafting,  Annette

Tuesday, April 5, 2016

Between The Folds Challenge #18B: Embellishments


This week's challenge at Between The Folds Challenge Blog is to use Embellishments.  Luckily, CTMH gives us plenty to choose from!  Enough that I had a really hard time choosing a project so I "cheated" and made several little projects, which are all tags I've made to add to gift bags for upcoming birthdays and special occasions.  I will share the details for each tag at the end of this post but first I just want to say that there are so many possibilities with this challenge, I want to encourage you to share your creations with us (you have until Monday, 4/11/16, at 11:55 p.m. Eastern/10:55 p.m. Central).  And don't forget to check out the inspiration from our design team and the other participants.  Happy crafting!  ~~  Annette


details:  All tags were cut using the Art Philosophy Cricut cartridge (image is shown on p.40, cut at 3" and the layer feature for the same key/page).

Make A Wish tag:  Wish stamp set in Pomegranate ink, Pixie Extra Thick Twine, Silver SequinsFlamingo DotsBitty Sparkles, and La Vie En Rose paper.

Wishing You tag:  Belated Birthday stamp set (retired) in Sapphire ink, Whisper Thick Twine, Silver Foil TapeDurable Triange Studs (silver), and Urban paper and white cardstock.

Everything Is Better tag:  Better With a Friend (retired hostess rewards stamp set) in Black ink, Red Enamel Hearts, and La Vie En Rose paper colored with Carmine ShinHan marker.

Happy Birthday tag:  Heartfelt Birthday Wish stamp set (retired) in Gypsy ink, Green Shimmer Trim and Enamel & Glitter Duos Purple Hearts, and Kaleidoscope paper.  I stamped the image twice, once on the card and once on the patterned paper (both times in Gypsy), and then I fussy cut the image on patterned paper and glued it in place.

Awesome Birthday tag:  Card Word Puzzle (retired) and the Say It All hostess rewards stamp sets in Sapphire ink, one of the buttons from the Urban Complements collection and Durable Triange Studs (gold), and Urban paper.