Showing posts with label Artiste. Show all posts

Wednesday, November 29, 2017

Blush and Gold Birthday Wishes for AHSC #240


Hello again, crafty friends!  Michelle Stewart has brought us another fabulous sketch to work with this week at the Atlantic Hearts Sketch Challenge, which I used for inspiration for a birthday card for my daughter.  Before I get into the details, I want to encourage everyone to share their take on this week's sketch by linking your projects HERE by 10:55 pm Eastern/9:55 pm Central on Sunday, 12/3/17.  You can also view the rest of the design team's creations by following THIS link. 

My daughter's 23rd birthday was this week and I wanted to make her a card that was both a little more grown up than the cards I've made her thus far.  She has several blouses that are either pale pink or white with gold accents and they have become the favorites in her wardrobe, so that was the inspiration for this card's color scheme.


details:  All products are from CTMH.  In order to size the banner and medallion elements the way I wanted, I had to upscale to a 5 x 7" card base.  I used gold foil paper for the base layer and then I used my Cricut and the retired Art Philosophy cartridge to cut this scalloped rectangle from Bashful glitter paper.  The white paper with gold foil hearts is from the current Silver and Gold kit and the balloons were cut from white and gold glitter paper at 1.5" using the retired Artiste cartridge, tied together with white and gold twine, and popped up with thin 3-D foam tape.  The other half of the triangle was a little trickier:  I started with the lighter side of the Bashful cardstock and over that I layered this clear, gold dotted acetate "paper" from the All About the Gold fundamental papers from the 2016-17 Idea Book.  Since it's clear acetate, I ran the piece through my large Xyron so there was a fairly consistent, widespread adhesive coverage.  For the banner, I used Versamark and gold embossing powder to heat emboss this sentiment from the retired Card Chatter - Birthday stamp set on white cardstock, backed on another piece of gold foil paper.  The base of the medallion was punched from gold foil paper using the retired 2" scallop punch.  The smaller scallop was cut on the lighter shade of Bashful cardstock, again using the retired Art Philosophy cartridge, at 1.5" and a duplicate medallion (with a 1.32" circle sliced from it) was cut from gold glitter paper.  I decided at the last minute, once I had my Cricut put away, that the medallion needed another layer so I cut one from white cardstock using my Cuttlebug and the smallest die from the basic circles Thin Cuts set.  The numbers were cut from gold foil paper at 0.658" with the alpha from the retired Artbooking cartridge.

For the inside, I used Pixie ink to stamp another sentiment from the same Card Chatter - Birthday set.  I used Bashful glitter paper and gold foil paper with the retired gift Thin Cut die to create the present in the left corner, and Bashful glitter paper with the smallest of the retired hearts Thin Cuts dies (the thin heart is from the actual die shape and smaller, "solid" heart is the "negative space" piece that was left over).  And that's all there is to this one... except for the mess I made and now have to clean up, LOL.

Thanks for stopping by and happy crafting!  ~~  Annette

Wednesday, February 22, 2017

More Hello Lovely for AHSC #200

Wow, it's our 200th sketch at the Atlantic Hearts Sketch Challenge already!  I have been a follower of this challenge blog since it first began, and the sketches and all the artwork have provided endless inspiration while challenging me to stretch my creative boundaries.  So whether this is your first time with us or you're an avid follower, I hope you enjoy it and find as much inspiration here as I have.  And while I'm on the subject, I want to say a huge THANK YOU to Michelle Stewart and all design team members, past and present, for sharing their creativity with us all!

Ok, gushing over, on to this week's sketch and project.  As soon as I saw this week's sketch I began making plans to revisit one of my all time favorite creations and actually had everything laid out to begin cutting, when I decided that would kind of be like cheating.  So it was back to the design board and I found myself turning to the beautiful Hello Lovely kit again...  No surprise, since I can't keep my hands off of it and there are scraps, complements, and coordinating stamp and die cut sets strewn across my craft area.


details:  I used Cricut Design Space and the CTMH Artiste cartridge (retired) to create and weld this grid and frame which I cut  at 5 1/4 x 4" on New England Ivy cardstock.  I backed the lighter floral panel of the Hello Lovely kit.  I used blush shimmer ribbon, this Sorbet-colored frame sticker from the Hello Lovely complements, and this sentiment from the Hello Lovely cardmaking stamp and die cut set stamped in a gold metallic ink from ColorBox.  It still needed a little extra something so I took the liberty of adding two tiny rose stickers from the same complements kit.  I have already made all the cards I need for upcoming family weddings, which are both in April, but I really see this one for an outdoor, June wedding...  I'm sure one will come along eventually!

I love this sketch, it's fairly clean and simple but it works for elegant cards too.  I hope you find time to try your hand at it this week and share your creation with us.  As always, you have until 11 pm Eastern/10 pm Central on Sunday, 2/26/17, to play along and you can link your projects HERE.

Thanks for stopping by and happy crafting!  ~~  Annette

Wednesday, October 19, 2016

Swan Lake for CTMH Featured Products Blog Hop

Hello and welcome back to another installment of the Close To My Heart Featured Products Blog Hop, where this week we are bringing you projects based on the Swan Lake kit.  If you came here from Corinna's blog you are in the right spot, but as always hops are circular things so you are welcome to jump in anywhere along the line and make the rounds.  Just in case you get lost along the way, I have included a complete list of this week's participants at the end of this post.  Let's get started!

I wanted to do something a little different for this project so I started this as a custom page for my Everyday Life Planner, intending to have a section for journaling on gratitude, but I love these cute pedestal card holders I got at Micheal's at graduation time, so I might just leave this out until Thanksgiving has past.

details:  I measured a Everyday Life Planner page and cut a piece of the Swan Lake paper to size.  I then turned to my Cricut and cut this white heart at 4 1/2" using the retired Artiste cartridge.  I used the Flower Market cartridge to cut the words out at 2.33" height using Poppy and Glacier CS.  For a little added visual interest (and because I love a little touch of glitter and bling) I wove some black and gold ribbon through the edges.  I thought it still needed a little more bling so I added 3 graduated-sized hearts for the top left and bottom right corners as well as this gold embossed bow, all from the retired Gold Fundamentals Assortment.

And that's all there is to this one, your next stop on our hop is Lauren's blog.  I hope you take time to make the complete tour and that you find inspiration for your own Swan Lake projects, and please stop back on 11/2/16 when we will be working with the City Sidewalks kit.
Thanks for stopping by and happy crafting!  ~~  Annette

Complete list of participants:

1.  Lauren Moore

2.  Janna Gray

3.  Donna Digby

4.  Corinna Murphy

5.  Annette Clark (here)

Wednesday, October 5, 2016

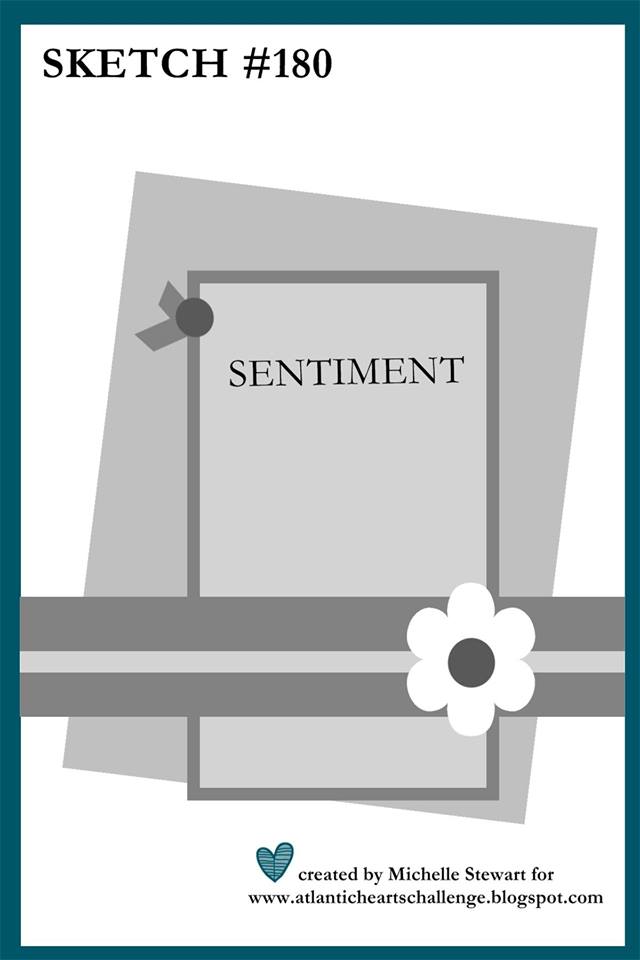
50th Birthday Card for AHSC #180

Hello, crafty friends!  A lifelong friend will be turning the big 5-0 in a few days so I was so happy I could use this week's sketch at the Atlantic Hearts Sketch Challenge to create a special card for the occasion.


details:  (All products used are from CTMH.)  I thought it was only fitting to add some touches of gold for a 50th birthday, and also a bit of black since I'm sure that seems to be a theme for the bigger milestone birthdays.  I started with a 4 x 6" base of Poppy CS with a 3 3/4 x 5 3/4" panel of Swan Lake.  For the panel behind the sentiment, I used the Art Philosophy cartridge to cut the numbers panel out of Glacier CS at 4" height but I had to trim the right edge by hand to make it better fit the sketch.  I used the retired "Just a Number" stamp set for the sentiment panel (cut at 2 x 3 1/4" white CS with a base of 2 1/4 x 3 1/2").  For the trim, I used the gold diagonal striped zip strip from last May's "Happy Times" kit and a bit of the gold foil tape for the bottom part of the card and the black and gold  ribbon that goes along with the Swan Lake kit in the upper corner of the sentiment panel.  I cut 2 hearts out of gold glitter paper with the Artiste cartridge at 1 and 1 1/2" and used some retired white and black embroidery thread for the string for the larger balloon.  I tried to stamp the "50" on the larger balloon but the ink didn't show up well enough, so luckily I had some stickers left from last year's version of the basics fundamentals pack.

Thanks for stopping by to take a look, and be sure to check out all the participants' entries as well as the design team members' projects.  We'd love to see your take on this sketch, too, and you can link your project HERE by 10 pm Central Time on Sunday, 10/9/16.

Happy crafting!  ~~  Annette


Wednesday, May 18, 2016

Graduation Card for AHSC #160

I can't believe it's time for another group of young people to be graduating high school and college!  Luckily, Michelle
Stewart over at Atlantic Hearts Sketch Challenge has given us another fun and fabulous sketch to work with so while this card had a lot of elements and was a tad time consuming, it actually came together quite easily. 


details:  I cut a 4 x 6" card base from Lagoon CS.  The star pattern is from the new Magical paper kit.  The blue in this kit is actually Crystal Blue but I was pleasantly surprised that it blended so well with the Lagoon as our recently consolidated school's new colors are teal (I use Lagoon), black and silver.  I used the stamp set that came with the Artiste cartridge (2 3/4" in black ink) for the center medallion and the same shape cut at 1 1/2" using a brushed silver paper from TPC Studio for the smaller medallions along with the retired 1 1/4" punch and Lagoon CS for the centers.  The graduation cap image is from the retired Congrats Graduate stamp, the diploma from the retired Diploma Day set, and the "Congratulations Graduate" sentiment was heat embossed (Versamark and silver Ranger embossing powder) using the retired You Did It stamp set.  I used the Art Philosophy cartridge to cut the pointed border at 1" and then trimmed it down so that just the points remained.  The sentiment in the lower corner is also from the Congrats Graduate set.

Thanks for stopping by and taking a look and please take time to stop by Atlantic Hearts Sketch Challenge to check out the projects by the rest of the design team.  Don't forget, you have until Sunday, 5/22, at 9 pm Central to share your project with us too!

Happy crafting!  ~~  Annette


Tuesday, April 19, 2016

Between The Folds Challenge 19B Featuring Regatta

Hello and welcome back!  Today I am sharing a fun card I made for the Between The Folds Challenge Blog where this week we are featuring CTMH's Regatta paper pack.  While I love the colors in this kit, living in the Midwest we are far from any coastlines so I wasn't sure what I might do with this one.  However, during a random conversation last week concerning family holidays I was reminded of how one of my aunts hosts dozens of people from both sides of the family every 4th of July, and I immediately knew what I wanted to do for this project.  I had also been wanting to try my hand at the drapery fold cards I have been seeing everywhere so I made that part of the project.  This kind of card might look challenging but it's actually super easy, now the hard part will be waiting three months to be able to give this to my aunt!


details:  As stated, this card features the Regatta paper kit.  If you look closely at the red and white striped paper, you will see it is actually white paper with very thin Glacier blue pinstripes.  To achieve the stripes I masked sections with washi tape and then sponged on Pomegranate ink.  Once I had cut, scored, and folded the card into the drapery fold pattern, I adhered the "flag" to a piece of white CS and backed that piece with a card base cut from Sapphire CS.  I used the Artiste Cricut cartridge to cut 2 rosettes at 1 1/4" from another piece of the Regatta papers and glued them together, and I topped that off with a chipboard star covered with the white piece from the gold glitter paper set.  The cursive "thanks" was stamped in Sapphire ink using the retired Hostess Rewards stamp set called  Variety of Thanks.

For the inside, I cut another piece of the white/blue pinstriped paper and rounded the edges.  I used Pomegranate ink again to stamp the banner image and the Sapphire ink for the sentiment, both of which are from the Banner Wishes set, onto the flip side of the white/blue pinstriped paper and fussy cut it.  I felt it was lacking a little something so I pulled out a punch and a scrap of the same paper to whip up a couple of little stars for the corners, and that's all there was to this one!


Thanks for stopping by and please remember to check out all the projects from the participants as well as the other design team members over at Between The Folds.  And don't forget, you have until Sunday evening to play along, the more the merrier!

Happy crafting!  ~~  Annette

Tuesday, February 23, 2016

Mother's Day Card for AHSC #148

I worked so hard and took a long time making my card for this week's sketch at Atlantic Hearts Sketch Challenge but it was worth it, I think it's my favorite of all the cards I've made so far.  Michelle Stewart gave us a FABULOUS sketch to work with, and I can't wait to see everyone else's creations.


details:  Once again, I used the Charlotte papers, complements, and those lovely gold tone Treasured Puffies.  I used the Artiste Cricut cartridge to cut the diamond grid from black CS and 2 patterns from the Charlotte kit and pieced those along with some fussy-cut pieces from the pink zip strips.  I used my ruler (a tool I truly could not papercraft without!) and gold metallic marker to mark the diagonal lines.  Then I used my scallop border punch and black shimmer trim to  make the border.  I used a piece of retired Baby Pink cardstock and gold embossed the image from the A Day For Mother on shapes cut from the Art Philosophy Cricut cartridge, and backed that with the black and gold ribbon and puffies.

For the inside, I just pieces some B&T from the Charlotte kit with one of the 3x4" pieces from the kit and stamped the sentiment from the My Mother set, and I couldn't resist adding a touch of shimmer with the more of the black and gold ribbon.


Thanks for stopping by and looking, and please take time to check out all the projects at AHSC this week.  Happy crafting!  ~~  Annette


Thursday, October 30, 2014

Halloween treat boxes for CMH #116

I kept telling myself I wasn't going to craft for Halloween since I'm now an empty nester, but then I decided to send treats to my daughter and her roommates at college.  And, as I'm sure any crafter can understand, once I got started crafting these cute little treat boxes I couldn't stop!  LOL  Luckily, there are a couple of Halloween-y challenges this week so I am submitting this at the Fantabulous Cricut Challenge Blog and over at the Color My Heart where this week's challenge it to use Sunset and Thistle (which just happen to be prominent colors in Close To My Heart's Scaredy Cat paper kit).
Anyway, I used some of the Scaredy Cat papers as some discontinued paper kits, 3 of CTMH's exclusive Cricut cartridges, as well as a discontinued stamp set for the "Happy Halloween" sentiment with the bat, and the Perfect Fit stamp sets -- I love working with these sets!

Happy (crafty) Halloween!  Annette


details:
  Art Philosophy cartridge was used to cut all treat containers as well as the scalloped circles in the center and the corresponding shapes for the Perfect Fit - Frames 2 stamp set.  The PF - Halloween stamp set was used for the smaller center shapes which could be cut with the AP cartridge or a 1 1/4" punch.   Jack o'lantern faces were cut from the Artbooking cartridge and the spider from the Artiste (with off-brand orange glitter glue for the eyes.  I chose to emboss the spider web design (from Paper Studios) rather than try to glue it onto 3-D projects.  The "Happy Halloween" sentiment with the bat is from an older, discontued CTMH set I borrowed from a friend; I can't find the name but the number is D1381).  White background/polka dot paper is from retired Spellbound kit and the darker fry box and spiders are from the Mischief kit, which is also retired.


Monday, September 1, 2014

Inspired by...

As soon as I got my new Chalk It Up paper kit I knew the first project I wanted to use it for was the Heart 2 Heart inspired by a movie challenge.  But, almost as soon as I decided that while this was the perfect paper to spotlight the movie I had in mind, my layout would be more about an unexpected pleasure in my life:  the fact that not only does my teenage daughter still want to go to movies with me but she and her best friend sometimes invite me to go with them.  Since my daughter graduated a year before her friend, her friend and I have even gone to see a couple of films together.  The three of us are self proclaimed book nerds and I love that we have a lot books and movies in common.  Even more than that, though, I treasure these times with my daughter because I missed out on these years with my own mother who passed away when I was 17 years old.

So, here is my project which was inspired primarily by the movie "The Fault In Our Stars," from the book by John Greene, as well as the favorite movies I have seen with just my daughter, just her friend, or the three of us together.  I have also included it at this week's Color My Heart challenge to use Lagoon, Flaxen, and Sorbet, which happen to be featured colors in the Chalk It Up kit.


details:  Chalk It Up paper kit, Circus alphabet (July stamp of the month); and the Artiste Cricut cartridge for the word bubbles and the film strips (each strip is actually 2 individual strips "welded" together using my Gypsy).

Happy crafting!  Annette


Wednesday, May 21, 2014

some get well hugs

Oh, life can get so busy sometimes!  What projects I have been working on lately have been for my own enjoyment so I have not taken time to post them here but I will soon have more free time on my hands to catch up on posting those projects.

At any rate, this week's color combo at the Color My Heart challenge was to use Buttercup and Hollyhock.  My best friend Kathy's daughter, Jackie, is an incredibly gentle and caring soul but the necessity of having a 2nd major surgery in less than a year has even her disheartened.  Her favorite color is currently bright pink and so when I saw these colors, I knew I had to make a special get well card to try to put a smile back on her face.

Although I have yet to get her mom to join me in scrapbooking, as a good friend Kathy listens patiently and sometimes looks at my current projects and pattern books when she comes by to visit, and she really liked the "hugs" card (pattern 19) in Make It From Your Heart, Vol. 1 so naturally I used that pattern for Jackie's card.  I used the Art Philosophy cartridge to cut the letters at 3/4", the Artiste cartridge for the shape (p.61) at 1", and I colored a set of (retired) color ready borders with markers in the appropriate colors.  I recently purchased some old patterned B&T papers from another another consultant so it was fun to find and play with some papers in the CTMH palette but with different patterns than what we currently have.  What can I say?  I am totally addicted to CTMH and papercrafting!  I can't wait to bake a batch of strawberry bread (a little tradition between Kathy and me, we always share a batch when times get tough) and pay a visit to my besties when they get back home!

Happy crafting!  Annette

Sunday, January 26, 2014

Love You to Pieces

I have spent a relaxing evening making cards while watching movies with my husband and when I came across an unfinished project from a year ago I immediately knew I could put it to use for a couple of current challenges.  I am using the sketch from Freshly Made Sketches and also sharing at Heart 2 Heart where the challenge this week is "two faced" or to use both sides of a designer paper.


details:  All products are from Close To My Heart.  I used the discontinued Roxie paper kit for the pieced heart as well as the card base as well as the discontinued Tulip for the banner.  I cut black shimmer trim in half to line the banner on the cover as well as the border inside the card.  I used Tulip ink for the sentiment from last year's "Happy Valentine's" Stamp of the Month on the cover and from the Stitch Wonder stamp set inside the card.  The large puzzle piece heart on the cover as well as the puzzle piece border on the inside were cut using the Artiste Cricut cartridge.

Happy crafting, Annette

Ivy Lane for Atlantic Hearts Sketch Challenge

I have only purchases one paper kit from CTMH's new Idea Book so far and I'm totally in love with it!  It has taken me several days to put this project together based on this week's sketch at Atlantic Hearts Sketch Challenge  I say project because I knew what elements I wanted to put together but they didn't size up quite the way I wanted so the finished size is 6 x 7 1/2 inches, so rather than using this for a card I'm thinking of making it the cover for a mini album.  I am also sharing this at this week's Heart 2 Heart challenge which calls for using both sides of a designer paper.


details:  All supplies are from Close To My Heart.  The green background paper and the multicolored paper for the vertical scalloped stripe are opposite sides of the the same paper from the Ivy Lane papers, and for the border I used the zip strips from the same kit and carefully mitered the corners.
I used the Artiste Cricut cartridge to cut the center shape and the scalloped stripe.  I sponged the edges of the center piece with the discontinued Pansy Purple and then I used the rock and roll stamping technique with the new Hello Wonderful stamp set in Blush and Hollyhock.  The sentiment in the corner is from the In The Moment, also using Pansy Purple.  To  make some of the cutout areas in the Cricut cut images stand out a little better, I added bitty and medium sized Opaques.

I have a feeling these stamps and this paper kit are going to be seeing a lot of use at my house!

Happy crafting,  Annette

Saturday, January 11, 2014

Buzzing with good wishes for a Mojo Monday challenge

One of the goals I've set for myself this year is to NOT wait until the very last minute for inspiration to strike, and since tomorrow is going to be a very busy day at my house it was good motivation to work on this card today -- 1 whole day before the deadline!  lol  At any rate, I really liked the sketch challenge this week at Mojo Monday and for whatever reason, when I saw the vertical strip along the left side it made me think of the burlap ribbon I have since summer and only used once.  As I looked through my papers and stamps I came across this Quick Card-Bumblebee stamp I got to use with the Buzz and Bumble kit but had never gotten around to using, so this is what i came up with.

Both the honeycomb and orange patterned papers are from the discontinued B&B kit which called for Cocoa but I when I stamped it the first time I thought it came off a little darker than I wanted so I switched the ink for the bee stamp and the cardstock embellishment below that for Chocolate.  I also used Chocolate ink with the alpha from the "You Are My Happy" campaign this fall.  The cardstock embellishment was a cut from the Artiste Cricut cartridge from CTMH.  This card is quite a contrast from the last one I made which featured a snowflake background but if you lived anywhere in the US and experienced the cold snap that just went through, you'll understand why I'm dreaming of all things spring-related!
Happy crafting!  Annette

Sunday, December 22, 2013

Sew Special for Atlantic Hearts Sketch Challenge

I am still doing a happy dance after spending an entire afternoon crafting.  I didn't realize how much I had missed it - or how badly I'm addicted, lol.  I have been doing some kind crafting for just about as long as I can remember but cross stitch was one of my first loves, so I was so excited to see the January 2014 Stamp of the Month "Cross Stitch Wishes" and thought it would be perfect to  use for this week's sketch at Atlantic Hearts Sketch Challenge.

details:  I broke out some discontinued papers from the "Clementine" and "Florentine" papers because I love the Twilight blue background paper on the "Florentine" paper and the warm neutrals and random faux stitching wandering through the designs on the "Clementine" papers.  I used the Artiste cartridge for the spool and sponged some Saddle ink onto the Champagne CS to add a little dimension, and then I wrapped it up with Crème Brulee baker's twine and popped it up with foam tape.  I used the Saddle, Twilight, and Sorbet colors from the "Florentine" kit for stamping the sentiment and sponged the edges of the center piece with Saddle.  Happy crafting,  Annette

Friday, November 29, 2013

Thanksgiving birthday card using Atlantic Hearts Sketch Challenge

Among the many things my daughter and I share in common, our birthdays are just a few days apart and both occasionally fall right on Thanksgiving, and this year it's her turn to be the "turkey girl."  I've made her birthday cards for the last several years but I wanted to incorporate that theme into the  card somehow but was stumped for a bit, but this week's sketch at Atlantic Hearts Sketch Challenge helped me pull it together.

Hope everyone had a blessed Thanksgiving holiday! 

Annette
 details:  All paper used was from the CTMH's discontinued Dreamin' kit.  I used the alpha from the "You Are My Happy" campaign for the front and "Card Chatter - Birthday" (both in Pacifica) for the sentiment inside.  The feathers and the "19th" were both cut using the Artiste Cricut cartridge from CTMH.

Thursday, May 2, 2013

announcement insert with Cricut Artiste

Oh, my, it has been way too long since I've been able to craft or had anything to post here and it's good to be back, although I won't be posting regularly until my daughter's graduation is over.  Such a busy time but I don't want to miss a single moment of this special time in her life!

That said, what little crafting I am currently doing is generally graduation themed but this project could work well for diy wedding or shower invitations as well.  For a number of reasons, our family is having an informal gathering at our home the day of graduation and my daughter's reception a week later.  Plans were going smoothly until I realized I was going to have to include some kind of explanation as the actual announcement doesn't mention a reception at all and there wasn't enough room on the formal invitation to explain...  so I did what any Cricut loving paper crafter would do and I crafted an insert.

I wanted the insert to fit in the 4x6 inch envelopes that came with the announcements I was using.  I started with 3x4 inch shipping or address labels and used my pc to type up my announcment and center it on each label.  Then I used the CTMH Artiste cartridge for the Cricut and chose the image featured on the card function on the letter "k" (see p.58 of the booklet).  I sized it to 4 inches height so that my 3x4 inch label fit the center area.  I chose to use the "hide" feature of my Gypsy (the bottom right of the 6 function icons on the Advanced tab) to hide or omit the little diamond shape cutout toward the center of each side of the card, but that was just my personal preference to ensure the sticky back of the labels didn't stick anywhere/to anything it wasn't supposed to.  So with the image sized and altered to my needs, I again used my Gypsy (or you could use the Cricut Craft Room) to repeat the image and arrange each one as closely as I could until I was able to fit 6 of these images on a page.  Once graduation is over, I will play with the newly updated Cricut Craft Room which I'm told is now compatible with Gypsy files, and I will try to upload the cut file I created for this project.

One word of advice if you use plain cardstock and want to embellish it as I did (using CTMH's "Love Life" set #1482), stamp each image after you've cut it and removed it from the cutting mat.  I tried random stamping my CS prior to cutting and even though I thought I had waited long enough for the ink to be completely dry, some ink was still picked on the small runners that hold the paper down while it's being cut and it made smudgy lines on some of my cuts.  While this was minor in this instance and I was still able to use all my pieces, it could be more of an issue depending on the project.

One of the things I loved about this project is that I was able to find a stamp image and choose colors that really complemented the image on the main announcement and I *LOVE* the new Champagne color, it's a warm neutral that complements almost any "pop" of color and it just lends an elegance to every project I've used it on so far.

Happy crafting to all and congrats to all the new graduates out there!

Annette

Monday, February 18, 2013

sentiment-al Paper Playtime

I'm so excited about this week's challenge at Paper Playtime which is to stamp a sentiment.  Not only does it promise lots of variety but I already have a project I can share.  Yay!!  I often have trouble finding inspiration for any given challenge until a few days after it's finished and that was the case for the Close To My Heart consultants blog hop featuring the February stamp of the month Home Sweet Home BUT I happened to be playing with this stamp last night and came up with a card I liked.  Not having any particular use in mind for it, I tucked it into my stash but now I can pull it back out and share it.  :-)

All products are from CTMH.  I started with some scraps I had from the Dakota paper kit and the Log Cabin pattern featured in "Originals" by Jeanette Lynton.  I trimmed the pieces to size and then I used the Artiste cartridge to cut the center shape.  I inked the edges and stamped the center image using Pacifica ink, being careful not to get any ink on the "YOU" at the bottom.  I then cleaned my stamp and let it dry, and then I used Barn Red for the "YOU," again just inking the part I needed.  Some of the versions I've seen of this card feature hinges or some other point of interest where the papers meet but I chose to use stars from the Typeset workshop on the go (retired) stamped in Whisper.
Once I was done I realized how well this card might work for my stepfather's birthday card this week so I played around with the same elements but I ended up using the Perfect Fit-Frames 2 and Perfect Fit-Birthday stamp sets.  I really liked this particular shape from the PF frames but the pattern on the stamped image ended up being a little busy against the red/blue patterned paper so I used the BACK of the stamp and generously inked it with Pacifica using a slightly twisting motion.  I *really* like how this turned out, it gave the image enough subtle shading and texture that I thought it looked like denim, and the more solid color not only tied in the patterned papers and put the focus on the sentiments.  The only issue was that when I used the back of the stamp it left a slightly off-centered opening for the sentiment but that was easily solved by adding a little circular frame of silver shimmer paper, which I cut with the Art Philosophy cartridge.

Happy crafting!  Annette

Friday, February 15, 2013

my "spin" on Freshly Made Sketches #73

For whatever odd reason, the first thing I thought of when I saw this sketch from Freshly Made Sketches this week was the Ferris wheel cut on CTMH's Artiste Cricut cartridge, and that made me think if my husband because he's such a boy at heart, LOL.  Anyway, it took a bit of thinking before I could piece it all together in the way I wanted to make a Valentine as unique as our lives together but I think I pulled it off and that boyish smile on his face was worth the extra time I took with this one.
Details:  As I mentioned, I use the Artiste cartridge for the Ferris wheel with Whisper for the circular part of the frame and then I cut the other pieces (which are grouped together as one image) in white and sponged the center support piece with Whisper ink.

I used the Dotty 4 You paper pack for the sky/cloud background as well as the gondola pieces, which I simply glued the pieces I had cut out of white CS on the back of the patterned paper and cut out each piece so the dotted paper showed on the front.  The heart image is in Smoothie using The Happy Couple (D1539).  The patterned paper at the bottom is from the Later Sk8r paper kit (X7167B) and I used Outdoor Denim CS behind the white banner.  Because I had a lot to say in a little space, I cut my CS to a size that would fit in the computer and typed my sentiment and then cut it to size.

For the inside, I used the Smoothie colored paper from the Dotty 4 You kit and cut a heart frame using the Art Philosophy cartridge and centered it over the sentiment, which was also done on the computer.  All in all, this is not your typical or traditional Valentine card but, well, that just wouldn't be our style.  Happy crafting, Annette
 

Monday, February 4, 2013

Freshly Made Sketches challenge with Chantilly

This is one of the new papers from Close To My Heart's Spring/Summer 2013 Idea Book, and I think these colors just sing "spring" so I was tickled pink (among other colors, LOL) to use this for the Freshly Made Sketches challenge this week.  Using this kit also gave me the opportunity to use several features on the Art Philosophy cartridge I hadn't used before as well as the Artiste cartridge, and I love how much I can do between these two cartridges!  Here's this week's inspiration sketch:


I used the AP cartridge to cut the tag and eggs and the Artiste cartridge to cut "Happy Easter" and the small banner (I just stamped "to you" using the A Typeface stamp set).  Both eggs have two layers and for the pink one, I sponged Cotton Candy over the decorative layer and Ruby around the edges, and I cut the decorative layer in Buttercup and adhered small pieces of some of two more papers from the Chantilly kit and Twilight cs.  I also used Sunset ribbon and Sweet Leaf brads; the kit uses Pear for the green but I had to substitute, hope it blends well enough.  It can be a little tricky to use a busy pattern for the background but I tried to balance or ground it by using Champagne and white for the tag and banner.
Happy crafting!  Annette

Tuesday, January 29, 2013

a little Valentine fun with the Artiste cartridge

The cut-out heart base of this card started out as an entirely different project but when I got that part completed and placed it on the patterned paper I planned to pair it with, they were just too busy together.  However, I loved the look of the two layers together and I wasn't ready to give up on it, so what's a crafty gal to do?  This gal went back to the Artiste cartridge and played around until I found this phrase, cut a matching heart in red and added a little stamping, shading, and bling and the result was a quick but striking little card.
All supplies were from Close To My Heart:  As I stated, I used the Artiste cartridge to cut the phrase, the heart, and both the pink and red layers of the cut-out hearts.  I used Ruby, Cotton Candy, and black on a white card base and I inked the edges of the heart in Ruby and used black ink and the retired Roxie workshop on  the go stamp.
Just in case you were wondering how I got all the red hearts behind the pink cut-out hearts, I did NOT cut a bunch of hearts and glue them behind the pink ones, LOL.  I used the "hide" feature on my Gypsy (also available on the Cricut craft room if you have registered your Artiste cartridge there) and "hid" each of the hearts for the layer I cut in red.  I liked this effect so much, I think I'm going to play around with the "hide" and "weld" features some more and see what other variations I can come up with.

Happy crafting!  Annette