sharing my addiction for scrapbooking and papercrafting with Close To My Heart & Cricut
Sunday, December 22, 2013
Sew Special for Atlantic Hearts Sketch Challenge

Welcome Little One for Mojo 324

Happy crafting, Annette
Monday, December 9, 2013
combined challenges using Nativity scene

Happy (therapeutic) crafting! Annette
Labels:
Color My Heart,
Freshly Made Sketches,
Glory to God
Friday, November 29, 2013
Thanksgiving birthday card using Atlantic Hearts Sketch Challenge
Among the many things my daughter and I share in common, our birthdays are just a few days apart and both occasionally fall right on Thanksgiving, and this year it's her turn to be the "turkey girl." I've made her birthday cards for the last several years but I wanted to incorporate that theme into the card somehow but was stumped for a bit, but this week's sketch at Atlantic Hearts Sketch Challenge helped me pull it together.
Hope everyone had a blessed Thanksgiving holiday!
Annette
details: All paper used was from the CTMH's discontinued Dreamin' kit. I used the alpha from the "You Are My Happy" campaign for the front and "Card Chatter - Birthday" (both in Pacifica) for the sentiment inside. The feathers and the "19th" were both cut using the Artiste Cricut cartridge from CTMH.
Labels:
Artiste,
Atlantic Hearts Sketch Challenge,
Dreamin'
Sunday, October 13, 2013
Breast Cancer Awareness month

details: As usual, all projects used are from Close To My Heart although several are discontinued. The base and border for the center panel are Hollyhock CS, the pink lacy patterned paper is from the discontinued "Lucy" kit. The middle layer was sponged with Baby Pink on white CS and stamped in Cotton Candy with one of the pieces from the "Save the Date" set; the 'live, laugh, love' sentiment is from the "Love Life" stamp set and the ribbon was stamped in Cotton Candy using the "Always Remember" stamp set. The sentiment inside the card was stamped in Cotton Candy again using the retired set "Rustic Alphabet."
Friday, August 30, 2013
adventure card for Retro Sketches challenge
I'm really sneaking this under the wire but I just have to share it at this week's Retro Sketches challenge, I've been planning it in my mind for several days and have barely had time to craft lately!
Thursday, August 15, 2013
Laughing Lola peace signs
I had
Happy crafting, Annette
Saturday, August 3, 2013
first layout with the Artbooking cartridge!
Just in case you haven't heard the news... Close To My Heart has come out with another exclusive Cricut cartridge and it is absolutely FABULOUS!!!! Here's my first layout using the Artbooking cartridge:
I am finishing up my daughter's graduation and senior year pics so I really wanted to use the school's colors. I tried one of the layouts in red and one in black and ended up taking the negative space pieces from one and trimming them down about 1/4" and resetting them in place. I had to use my computer to scan, copy and size the mascot emblem and I cut a piece of cardstock down to a 4x6" rectangle and ran it through the printer, cut it in a circle and inked the edges to make it stand out. I also cut the banner photo mat with the Artbooking cartridge and used the Keyboard Uppercase stamp set for "class of 2013." Prior to getting the cartridge I had already cut out several of the "Red Raiders" pieces using an alpha from a Cricut cartridge called Paper Lace so I used those, and I just love what I came up with!
For Always WOTG for
I have been playing around with variations of the pattern from the For Always Workshop on the Go using our school colors and finally got it done... just in time to enter it for exhibit at our state fair. I LOVE this paper and I'm so glad it was one of the papers carried over from the last catalog!!!
I used the stamp sets from the Artbooking cartridge for the word "lovely" in the upper left corner as well as the lacey shape in the middle of the right hand page. I used the monogram stamps and embossed them in silver on black cardstock for the school's initials, I used the black glitter tape along the bottom of the photos and black & grey sparkles assortment for a little added bling.
Happy crafting! Annette
Thursday, August 1, 2013
For Always CAS layout
This project is not for any online challenge but something I have challenged myself to do, something on my bucket list: not only have I captured an image that represents a big part of my daughter's personality but I'm going to enter this for exhibit at our state fair, my first time doing so. It's a really clean and simple layout but I felt that's what was most fitting for these pictures. I admit I tried various other layouts and several other paper kits but kept coming back to this one... and I even got my daughter's stamp of approval!

I used the For Always paper kit and White Daisy, Slate, and Black cardstock and the large black gems in the black and gray sparkles set. I wanted a font that looked handwritten so I used the one from the Paper Lace Cricut cartridge.
Happy crafting!
Annette
I used the For Always paper kit and White Daisy, Slate, and Black cardstock and the large black gems in the black and gray sparkles set. I wanted a font that looked handwritten so I used the one from the Paper Lace Cricut cartridge.
Happy crafting!
Annette
Saturday, July 27, 2013
Don't miss your chance to work this workshop!
I immediately fell in love with the Art Canvas Workshop on the Go but life has been so busy I hadn't gotten around to using it yet... but I finally made time tonight and the results were worth the wait! There is a promotion through the end of July called "Work the Workshop" in which these kits (originally $39.95) are only $19.95. It's such a fabulous kit and awesome deal I may have to pick up a few more!
All supplies are from Close To My Heart: Art Canvas WOTG, Chocolate and Cranberry inks, and the Token alphabet stamp set for the "2013."
Happy crafting, Annette
Sunday, July 7, 2013
A happy, happy, happy birthday card for my husband...
I discovered that the Pause, Dream, and Enjoy challenge has transformed into a new challenge blog called An Inky Situation and their first challenge is "anything goes," so I thought that would be a lovely excuse to share this particular card. I am also entering this in the current challenge at the Heart 2 Heart blog where this week's theme is "Mix & Mingle" and calls for using 3 or more paper kits or stamp sets.
A couple of years ago my husband decided he wasn't just going to celebrate his birthday one day out of the year but that he was going to have a "birthday season" which would run from Father's Day through July 4th and his birthday which is in the same week, and pretty much through whatever special events we're doing as a family so he usually calls it good when the state fair winds up. He recently become a big "Duck Dynasty" fan and his new favorite saying from the show is, "Happy, happy, happy," and for Father's Day we found him a black shirt with that saying in red writing. So I wanted to incorporate that into his birthday card but it took a while for inspiration to strike... at the last minute of course! It turned out to be a little more time consuming than I anticipated it was worth it when he got it and I saw his smile.
details: All products used are from Close To My Heart. I covered the front of the card with a layer of Cranberry cardstock and used my Gyspy and Cricut along with the CTMH Artiste cartridge to line up and cut the letters. I used black ink and the "Tiny Typewriter" alpha for the stamped sentiment on the cover and inside the card. I inked the "Moments In Time" calendar images in Grey Wool and sponged Cranberry over the dates officially part of the birthday season. For the patterns behind the top and bottom "happy" on the front I used "Diverse Backgrounds" and "In the Background" for the middle one. I felt like it was missing something but I wanted to keep it masculine so I added some black twine, which isn't something I use very often but I was pleased with the results.
Happy crafting and best wishes to the folks over at the Inky Situation blog as well as the new design teams at H2H!
Annette
Happy crafting and best wishes to the folks over at the Inky Situation blog as well as the new design teams at H2H!
Annette
Wednesday, June 12, 2013
a stamping project you may not have considered...
Since this isn't the usual papercrafting project and the challenge this week at Paper Playtime is "Anything Goes," I thought this would be a good project to share.
So my daughter and I are signed up to do our first Relay for Life and I purchased some luminaries to decorate. I was inspired to use my Close To My Heart stamping products on them and I was so impressed with how they turned out and how quickly and easily they came together. As it turns out, the very day I had set aside to make the luminaries, someone very dear to my family was receiving a diagnosis so I left my stamps set up on the blocks, made a phone call to our team's organizer, and got some more luminaries delivered right to my door and we're still making them so our loved one will have a big show of support right from day one!

Here's a tip, though, use the liner that's used as backing in your stamp packages and slip it inside the bag so the folds and extra layers of the bag won't throw your stamped images off. For this project I used the discontinued "Always Remember" and "Tiny Typewrite" stamps in Pear along with the Bohemian alphabet in Cotton Candy.
Happy (and heartfelt) crafting Annette
So my daughter and I are signed up to do our first Relay for Life and I purchased some luminaries to decorate. I was inspired to use my Close To My Heart stamping products on them and I was so impressed with how they turned out and how quickly and easily they came together. As it turns out, the very day I had set aside to make the luminaries, someone very dear to my family was receiving a diagnosis so I left my stamps set up on the blocks, made a phone call to our team's organizer, and got some more luminaries delivered right to my door and we're still making them so our loved one will have a big show of support right from day one!
Here's a tip, though, use the liner that's used as backing in your stamp packages and slip it inside the bag so the folds and extra layers of the bag won't throw your stamped images off. For this project I used the discontinued "Always Remember" and "Tiny Typewrite" stamps in Pear along with the Bohemian alphabet in Cotton Candy.
Happy (and heartfelt) crafting Annette
Labels:
Always Remember,
Bohemian alphabet,
luminaries,
Relay for Life
Wednesday, June 5, 2013
catching up with digital scrapbooking!
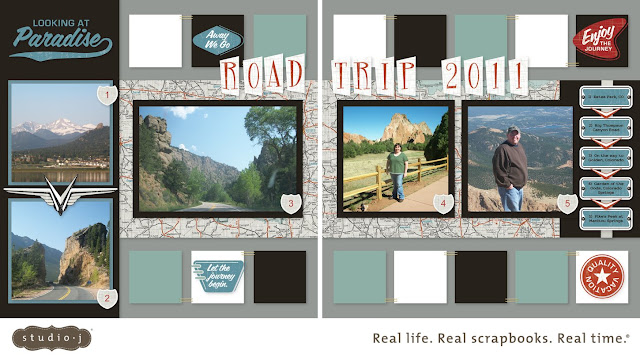
I know I'm not the only scrapbook enthusiast who feels "behind" but with my daughter having just finished high school I really want to spend this summer getting caught up and capturing all those memories while they're still fresh. I also want to finish up all those projects I have started but not completed. So with this goal in mind I sat down on Monday evening and went through the digital scrapbook projects I have started. I saw I had a couple of projects that were nearly finished and they were from 2 years ago, and both featured my brother and his girlfriend. Since she has a birthday in about a week, I challenged myself to finish these layouts and compete enough new ones to use a 5-pack code and get them in the mail in time for her birthday... and thanks to Studio J I was able to get all 5 finished and purchased that evening and they are already in the mail and on their way! I can't say enough good things about Studio J or how much I love it. So enough of my chatter, here's a sneak peek at what the birthday girl will be getting this year (and if ads, etc. block any of the pics just click on the pics and you'll get to see them in a pop up screen).
One note, although there are plenty of journaling and caption options on Studio J, I didn't include any include any on the reunion pages for fear I would either spell someone's name wrong or get some of the names mixed up, but it's an easy fix to make and add labels and tags, even some "hidden" pull-out journaling tabs, once we have the printed layouts in hand.
And you know something? Just making a little dent in my list of to-do projects has let me ditch some of that guilt and really enjoy my favorite hobby again! It's going to be a very productive and colorful summer at my house!
Happy crafting, Annette
Wednesday, May 22, 2013
Freshly Made Sketches for a 40th birthday
details: For the outside of the card, I started with the For Always paper pack which included the Lagoon cs and to tie it in I swiped the vertical strip of patterned paper with the Lagoon ink pad, and I used the Card Chatter-Birthday stamp set in black. For the numbers I used a random dull silver paper and black cardstock for the backing and made the cut from the Black Letter alpha that came preloaded when I got my Gypse. For the inside, I used Lagoon ink to stamp the Love Doily on the card base and black ink to stamp the sentiment from Hooray Bouquet set inside one of the frames from the Frame Flair set. For the envelope I stamped Lagoon ink on Lagoon CS using a stamp from the first Perfect Fit Frames set and then I used black ink and my friend's intial from the monogram sets, backed with the zip strip from the For Always patterned paper I used for the card. I hope my friend doesn't mind that I used her birthday present stamp to make her card. :-)
Happy crafting! Annette
Labels:
Card Chatter-birthday,
For Always,
Frame Flair,
Hooray Bouquet,
Love Doily,
monogram,
Perfect Fit Frames
Thursday, May 2, 2013
announcement insert with Cricut Artiste
Oh, my, it has been way too long since I've been able to craft or had anything to post here and it's good to be back, although I won't be posting regularly until my daughter's graduation is over. Such a busy time but I don't want to miss a single moment of this special time in her life!
That said, what little crafting I am currently doing is generally graduation themed but this project could work well for diy wedding or shower invitations as well. For a number of reasons, our family is having an informal gathering at our home the day of graduation and my daughter's reception a week later. Plans were going smoothly until I realized I was going to have to include some kind of explanation as the actual announcement doesn't mention a reception at all and there wasn't enough room on the formal invitation to explain... so I did what any Cricut loving paper crafter would do and I crafted an insert.
I wanted the insert to fit in the 4x6 inch envelopes that came with the announcements I was using. I started with 3x4 inch shipping or address labels and used my pc to type up my announcment and center it on each label. Then I used the CTMH Artiste cartridge for the Cricut and chose the image featured on the card function on the letter "k" (see p.58 of the booklet). I sized it to 4 inches height so that my 3x4 inch label fit the center area. I chose to use the "hide" feature of my Gypsy (the bottom right of the 6 function icons on the Advanced tab) to hide or omit the little diamond shape cutout toward the center of each side of the card, but that was just my personal preference to ensure the sticky back of the labels didn't stick anywhere/to anything it wasn't supposed to. So with the image sized and altered to my needs, I again used my Gypsy (or you could use the Cricut Craft Room) to repeat the image and arrange each one as closely as I could until I was able to fit 6 of these images on a page. Once graduation is over, I will play with the newly updated Cricut Craft Room which I'm told is now compatible with Gypsy files, and I will try to upload the cut file I created for this project.
One word of advice if you use plain cardstock and want to embellish it as I did (using CTMH's "Love Life" set #1482), stamp each image after you've cut it and removed it from the cutting mat. I tried random stamping my CS prior to cutting and even though I thought I had waited long enough for the ink to be completely dry, some ink was still picked on the small runners that hold the paper down while it's being cut and it made smudgy lines on some of my cuts. While this was minor in this instance and I was still able to use all my pieces, it could be more of an issue depending on the project.
One of the things I loved about this project is that I was able to find a stamp image and choose colors that really complemented the image on the main announcement and I *LOVE* the new Champagne color, it's a warm neutral that complements almost any "pop" of color and it just lends an elegance to every project I've used it on so far.
Happy crafting to all and congrats to all the new graduates out there!
Annette
Friday, February 22, 2013
Buzz and Bumble for SFC

Happy crafting! Annette
Monday, February 18, 2013
sentiment-al Paper Playtime
I'm so excited about this week's challenge at Paper Playtime which is to stamp a sentiment. Not only does it promise lots of variety but I already have a project I can share. Yay!! I often have trouble finding inspiration for any given challenge until a few days after it's finished and that was the case for the Close To My Heart consultants blog hop featuring the February stamp of the month Home Sweet Home BUT I happened to be playing with this stamp last night and came up with a card I liked. Not having any particular use in mind for it, I tucked it into my stash but now I can pull it back out and share it. :-)
All products are from CTMH. I started with some scraps I had from the Dakota paper kit and the Log Cabin pattern featured in "Originals" by Jeanette Lynton. I trimmed the pieces to size and then I used the Artiste cartridge to cut the center shape. I inked the edges and stamped the center image using Pacifica ink, being careful not to get any ink on the "YOU" at the bottom. I then cleaned my stamp and let it dry, and then I used Barn Red for the "YOU," again just inking the part I needed. Some of the versions I've seen of this card feature hinges or some other point of interest where the papers meet but I chose to use stars from the Typeset workshop on the go (retired) stamped in Whisper.
Once I was done I realized how well this card might work for my stepfather's birthday card this week so I played around with the same elements but I ended up using the Perfect Fit-Frames 2 and Perfect Fit-Birthday stamp sets. I really liked this particular shape from the PF frames but the pattern on the stamped image ended up being a little busy against the red/blue patterned paper so I used the BACK of the stamp and generously inked it with Pacifica using a slightly twisting motion. I *really* like how this turned out, it gave the image enough subtle shading and texture that I thought it looked like denim, and the more solid color not only tied in the patterned papers and put the focus on the sentiments. The only issue was that when I used the back of the stamp it left a slightly off-centered opening for the sentiment but that was easily solved by adding a little circular frame of silver shimmer paper, which I cut with the Art Philosophy cartridge.
Happy crafting! Annette
Labels:
Art Philosophy,
Artiste,
Dakota,
Paper Playtime
Sunday, February 17, 2013
Seeing red for the Pause, Dream & Enjoy challenge
This week's challenge at the Pause, Dream and Enjoy challenge was to use mostly red. While I have nothing against red it isn't necessarily my go-to color either, but then something reminded me of the Go Red for Women campaign each February to help make women more aware and proactive with their heart health, and this simple little card is what I came up with.
As usual, all products are from Close To My Heart. I used the retired Be Yourself stamp set which I first stamped in black and then in Ruby on a separate piece of CS, then I cut out the dress and shoe areas of the red stamped image and glued them on the black stamped image. This is stamp set I've had for awhile and hadn't used yet but I really like it, I especially like how it gives a sort of modern silhouette image when stamped like this. I also *love* CTMH's new Silver Shimmer Trim, it's so versatile! I wanted thin strips of silver to frame the image so I cut two strips of the shimmer tape, one the length of the card and one the height, and then I cut each strip up the middle and it was so easy to work with. I also added a red sparkle where each strip overlapped. The sentiment was also stamped in Ruby.
So ladies, please remember to take care of yourselves and your hearts!
happy crafting, Annette
So ladies, please remember to take care of yourselves and your hearts!
happy crafting, Annette
Friday, February 15, 2013
my "spin" on Freshly Made Sketches #73
For whatever odd reason, the first thing I thought of when I saw this sketch from Freshly Made Sketches this week was the Ferris wheel cut on CTMH's Artiste Cricut cartridge, and that made me think if my husband because he's such a boy at heart, LOL. Anyway, it took a bit of thinking before I could piece it all together in the way I wanted to make a Valentine as unique as our lives together but I think I pulled it off and that boyish smile on his face was worth the extra time I took with this one.
Details: As I mentioned, I use the Artiste cartridge for the Ferris wheel with Whisper for the circular part of the frame and then I cut the other pieces (which are grouped together as one image) in white and sponged the center support piece with Whisper ink.
I used the Dotty 4 You paper pack for the sky/cloud background as well as the gondola pieces, which I simply glued the pieces I had cut out of white CS on the back of the patterned paper and cut out each piece so the dotted paper showed on the front. The heart image is in Smoothie using The Happy Couple (D1539). The patterned paper at the bottom is from the Later Sk8r paper kit (X7167B) and I used Outdoor Denim CS behind the white banner. Because I had a lot to say in a little space, I cut my CS to a size that would fit in the computer and typed my sentiment and then cut it to size.
For the inside, I used the Smoothie colored paper from the Dotty 4 You kit and cut a heart frame using the Art Philosophy cartridge and centered it over the sentiment, which was also done on the computer. All in all, this is not your typical or traditional Valentine card but, well, that just wouldn't be our style. Happy crafting, Annette
Details: As I mentioned, I use the Artiste cartridge for the Ferris wheel with Whisper for the circular part of the frame and then I cut the other pieces (which are grouped together as one image) in white and sponged the center support piece with Whisper ink.
Wednesday, February 13, 2013
a sympathy card for the Stamptacular Sunday Challenge
Labels:
Dreamin',
Stamptacular Sunday challenge,
sympathy
Tuesday, February 12, 2013
Seize the Birthday with a Roxie rose

Happy crafting! Annette
Thursday, February 7, 2013
Color My Heart challenge #28

I had actually made a card similar to this one a while back with different colors and this retired stamp set "Buttoned Together," and when I saw this challenge I held off in hopes I would receive my Buttons, Bits & Bobs (B1408) stamp so I could use a stamp that is still being sold but I didn't my stamp set in time. The stitching around the edges is actually made as a straight line but one of the things I love most about CTMH's stamps is they are flexible enough you can manipulate many of them to accomodate different shapes or bending. At any rate, here is my card, a clean and simple card that was quick to make and will hopefully brighten a good friend's day.
Happy crafting! Annette
Monday, February 4, 2013
Freshly Made Sketches challenge with Chantilly
This is one of the new papers from Close To My Heart's Spring/Summer 2013 Idea Book, and I think these colors just sing "spring" so I was tickled pink (among other colors, LOL) to use this for the Freshly Made Sketches challenge this week. Using this kit also gave me the opportunity to use several features on the Art Philosophy cartridge I hadn't used before as well as the Artiste cartridge, and I love how much I can do between these two cartridges! Here's this week's inspiration sketch:
I used the AP cartridge to cut the tag and eggs and the Artiste cartridge to cut "Happy Easter" and the small banner (I just stamped "to you" using the A Typeface stamp set). Both eggs have two layers and for the pink one, I sponged Cotton Candy over the decorative layer and Ruby around the edges, and I cut the decorative layer in Buttercup and adhered small pieces of some of two more papers from the Chantilly kit and Twilight cs. I also used Sunset ribbon and Sweet Leaf brads; the kit uses Pear for the green but I had to substitute, hope it blends well enough. It can be a little tricky to use a busy pattern for the background but I tried to balance or ground it by using Champagne and white for the tag and banner.
Happy crafting! Annette
Sunday, February 3, 2013
Using what I've got #2
So once again I missed a deadline to submit this for a challenge (Stamptacular Sunday #200 to use spots and stripes in case you're curious) but I thought it turned out well enough to go ahead and share. This is the first card I've made using this sketch from Make It From Your Heart Vol.1 and this is another project featuring retired but previously unused items from my stash, and I felt this was the *perfect* sentiment for the person this card is intended for.
All products used are from Close To My Heart. The paper is the retired "Sophia" kit which features Hollyhock, Blush, and Pear. The stamp is from the "Live Out Loud" set which was the stamp of the month in July '12, and the shape was cut using the Art Philosophy cartridge.
Happy crafting, Annette
Tuesday, January 29, 2013
a little Valentine fun with the Artiste cartridge
The cut-out heart base of this card started out as an entirely different project but when I got that part completed and placed it on the patterned paper I planned to pair it with, they were just too busy together. However, I loved the look of the two layers together and I wasn't ready to give up on it, so what's a crafty gal to do? This gal went back to the Artiste cartridge and played around until I found this phrase, cut a matching heart in red and added a little stamping, shading, and bling and the result was a quick but striking little card.
All supplies were from Close To My Heart: As I stated, I used the Artiste cartridge to cut the phrase, the heart, and both the pink and red layers of the cut-out hearts. I used Ruby, Cotton Candy, and black on a white card base and I inked the edges of the heart in Ruby and used black ink and the retired Roxie workshop on the go stamp.
Just in case you were wondering how I got all the red hearts behind the pink cut-out hearts, I did NOT cut a bunch of hearts and glue them behind the pink ones, LOL. I used the "hide" feature on my Gypsy (also available on the Cricut craft room if you have registered your Artiste cartridge there) and "hid" each of the hearts for the layer I cut in red. I liked this effect so much, I think I'm going to play around with the "hide" and "weld" features some more and see what other variations I can come up with.
Happy crafting! Annette
Tuesday, January 22, 2013
Seize the Birthday #2 with *new* papers
I know we CTMH consultants are supposed to keep the items from the new Idea Book under wraps until 2/1/13 but I keep seeing little peeks here and there and I was just so excited to see a masculine paper I could really use for my guys that I couldn't resist! So here is a sneak peek at one of the new paper kits in the Spring/Summer Idea Book which goes online Feb. 1st, but if you live in southwest Iowa contact me to get an invite to my open house on January 27th and get your Idea Book to see all the fabulous new products for yourself!
Ok, as I said, I simply could not resist using this paper for this week's Seize the Birthday masculine card challenge from their featured sketch. All products used are from Close To My Heart: I used the new "Later Sk8r" paper kit, I cut the gear using the Artiste cartridge on Slate paper which I backed with a simple circle of Whisper, I edged and random sponged Slate over the gear as well to give it some dimension. The sentiment was stamped in Outdoor Denim using a retired set called "Gear Up" which is yet another set I hadn't quite gotten around to using yet but I think this one will be seeing a lot of ink in the near future.
Talk about a banner day! I had a paid holiday, I posted 2 projects, broke out 2 stamps I had not used before, I got to use a new paper kit and the Artiste cartridge, AND I'm over a month *early* making a birthday card with a specific person in mind. Oh, yeah, and we had lots of leftovers from the weekend so I didn't even have to cook!!!! This is pretty close to heaven on earth, LOL.
Happy crafting, Annette
Monday, January 21, 2013
Playdate cafe #165 and using what I've got
Once again, all supplies used were from Close To My Heart. I used the Quick Cards-Butterfly stamp set, and after experimenting with several color and shade combinations I ended up going with Pansy Purple, Creme Brulee, and Hollyhock. These might be slightly darker colors than those suggested at PDCC but I inked the stamp in the Creme Brulee and sponged the other colors onto the stamp which toned down and softened the colors, and then I stamped the sentiment directly in the ink so the lettering would stand out. I used the AP cartridge to cut the tag using the same colors CS as the ink, sponging Hollyhock onto the edges of the Creme Brulee frame and then finished everything off with a Hollyhock brad. I plan on using this tag as an embellishment for a page in my personal scrapbook/journal and I also get the satisfaction of knowing I've made use of another stamp in my stash that was waiting to see ink.
Happy crafting! Annette
Labels:
Art Philosophy,
Playdate Cafe,
Quick Cards-Butterfly
Subscribe to:
Posts (Atom)